 Admin
Admin Flaky, Golden Lacha Paratha
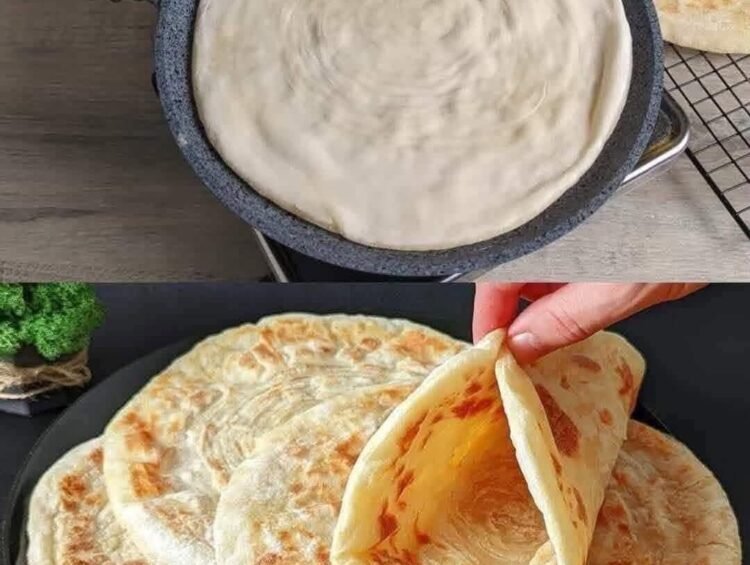
If you want to master one of the most incredible flatbreads in the world, Lacha Paratha (layered, flaky flatbread) is an absolute triumph. Originating from the Indian subcontinent, it features dozens of paper-thin, buttery layers that shatter when you bite into them, giving way to a soft, chewy interior.
While it looks intimidating with all those intricate folds, making restaurant-quality lacha paratha at home comes down to a few brilliant dough-rolling techniques!
The Culinary Science of Flaky Layers
Just like puff pastry or croissants, achieving those signature flaky layers in a flatbread doesn’t require yeast; it relies on mechanical lamination:
-
The Coil and Stretch Technique: By stretching the dough into a long ribbon, brushing it with fat, and pleating it like a hand fan before rolling it into a snail shell (coil), you trap multiple layers of fat between sheets of dough.
-
Steam Expansion: When the coiled dough hits the hot, oiled griddle, the water in the ghee or butter turns to steam. That trapped steam forces the individual layers apart, creating a light, airy, layered structure as it crisps up.
Ingredients
-
The Dough:
-
2 cups all-purpose flour (or atta / whole wheat chapati flour for a more traditional, rustic texture)
-
1 teaspoon granulated sugar (helps with browning)
-
1 teaspoon salt
-
2 tablespoons melted ghee or neutral oil
-
3/4 to 1 cup lukewarm water (plus extra as needed)
-
-
The Lamination & Cooking:
-
4 to 6 tablespoons melted ghee or butter (crucial for creating those rich, separate layers)
-
2 to 3 tablespoons extra dry flour for dusting the counter
-
Step-by-Step Instructions
1. Make and Knead the Dough
-
In a large bowl, whisk together the flour, sugar, and salt.
-
Pour in 2 tablespoons of melted ghee and gradually add the lukewarm water, mixing with your hands until a cohesive dough forms.
-
Turn the dough out onto a clean counter and knead vigorously for 5 to 7 minutes until it becomes smooth, elastic, and soft.
-
Cover the dough with a damp cloth and let it rest for 30 minutes. (Resting relaxes the gluten strands, making the dough easy to stretch without tearing).
2. Divide and Roll
-
Divide the rested dough into 4 to 6 equal balls.
-
Take one dough ball, dust it lightly with flour, and roll it out on your work surface into a very thin, large circle (about 8 to 10 inches wide).
3. Apply Fat and Pleat (The Magic Step)
-
Brush a generous spoonful of melted ghee evenly across the entire surface of the rolled-out circle. Dust a light pinch of dry flour over the ghee (this stops the layers from sticking together permanently).
-
Gather the circle into a pleated accordion fold (like making a paper hand fan) from one side to the other.
-
Take one end of the pleated strip and roll it up tightly into a snail-like coil (spiral), tucking the very end underneath the bottom and pressing it down gently. Repeat with all dough balls. Let the coils rest for 10 minutes.
4. Final Roll-Out
-
Take one resting coil, dust it gently with flour, and use your rolling pin to flatten it back out into a thick round disk (about 6 to 7 inches wide and 1/4-inch thick). Tip: Roll gently so you don’t crush the layers!
5. Cook on the Griddle (Tawa)
-
Heat a heavy cast-iron skillet, tawa, or skillet over medium-high heat until hot.
-
Place the paratha onto the dry, hot pan. Cook for about 1 minute until small bubbles appear on the surface.
-
Flip the paratha. Brush the top surface generously with 1 teaspoon of melted ghee.
-
Flip it again and brush the other side with ghee. Cook for another 1 to 2 minutes, pressing gently with a spatula, until both sides are golden-brown and speckled with crisp, dark spots.
6. Crush and Fluff
-
Remove the hot paratha from the pan. While it is still piping hot, gently clap the paratha between your hands from opposite sides (or crush it slightly on the counter with a spatula). This forces the layers to pop open and creates that signature fluffy, flaky texture!
Pro-Tips for Success
-
Keep Covered: Always keep your raw dough balls and coils covered under a damp towel while you work so they don’t dry out and form a hard skin.
-
Serving Suggestions: Serve these hot, flaky parathas immediately alongside a rich curry (like butter chicken or chana masala), a dollop of yogurt, or with a simple cup of spiced chai.
Are you serving these lacha parathas with a rich curry dinner, or keeping it traditional with morning chai?